WorryFree Computers   »   [go: up one dir, main page]

Top10VPN is editorially independent. We may earn commissions if you buy a VPN via our links.

How to Set Up and Use a VPN

Callum Tennent oversees how we test and review VPN services. He's a member of the IAPP, and his VPN advice has featured in Forbes and the Internet Society.

Fact-checked by JP Jones

In this guide, we explain how to set up and use a VPN on popular platforms including Android, Windows, iOS, and macOS devices. We’ll show you the easiest VPN setup method for each platform, and some additional approaches you can try if they don’t work.

VPN Setup

A virtual private network (VPN) can protect your online privacy and security, bypass censorship, and unblock geo-restricted streaming services.

You can use a VPN on almost every popular device, but the setup process may differ between them

In this guide, we’ll show you how to set up a VPN service on every major platform. We’ll walk you through how to register for a subscription and install a VPN application, as well as some alternative setup methods you can use if that’s not possible on your chosen device.

Summary: How to Set Up and Use a VPN

The easiest way to set up a VPN on almost any device is simply to download the native application from the VPN provider. Here’s how to do it:

  1. Choose a VPN service that meets your needs. Consider its trustworthiness, device compatibility, server coverage, and other factors important to you before making a decision.
  2. Visit the VPN service’s website. Here, you can register for an account, choose a pricing plan, and subscribe to the VPN.
  3. Download and install the VPN app for your chosen device. If you’re using a PC or laptop, you can download the app from your VPN service’s website. If you’re on mobile you can download the app from your device’s app store.
  4. Launch the VPN app and sign in.
  5. Turn on the VPN kill switch and use the correct protocol. We recommend using WireGuard or OpenVPN.
  6. Choose a VPN server. You can find a full server list within the app. We suggest selecting the server closest to your real-life location for the fastest connection speeds.
  7. Connect to the VPN. This may have happened automatically when you selected a server in the previous step, otherwise you can click the ‘connect’ button on the home screen.
  8. Browse anonymously. Your VPN is now successfully installed and will hide your IP address and encrypt your browsing activity.

Here’s a video demonstrating how to set up and use a VPN from start to finish:

How to set up and use a VPN from start to finish.

We’ve used macOS in the example above, but the process is almost identical for other devices. If you’re using a phone, simply download the VPN application from your app store instead.

If you want to set up your own VPN so you can access your local network while abroad, read our guide to creating your own VPN server at home.

Use the table below to find the easiest setup method for your preferred device. You can also click the name of each device to jump to our detailed VPN setup instructions.

Device/OS Easiest VPN Setup Method Top Alternative
Windows Native VPN application If you can’t install a VPN app, try manual VPN connection setup.
macOS Native VPN application If you can’t install a VPN app, try manually configuring a VPN.
iPhone/iOS Native VPN application If you can’t install a VPN app, try using the iOS built-in VPN client.
Android Native VPN application If you can’t access the Google Play Store, try installing an APK.
Smart TV, PlayStation 4 & 5, Xbox Smart DNS

If you need encryption and privacy, run a VPN on your computer and share its connection.

How to Set Up a VPN on an Android Smartphone or Tablet

ExpressVPN's app for Android

What You’ll Need to Set Up a VPN on Android

  • An Android smartphone or tablet
  • A VPN subscription

There are several different ways to set up a VPN on Android, most of which are very simple.

NOTE: Android offers a built-in VPN client, but we don’t recommend using it. Android’s proprietary VPN uses insecure VPN protocols such as PPTP, which can be hacked in minutes.

1. Install a Native VPN App for Android (Easiest Method)

You can install a VPN app directly onto your Android. This is the easiest method and it will take you less than two minutes.

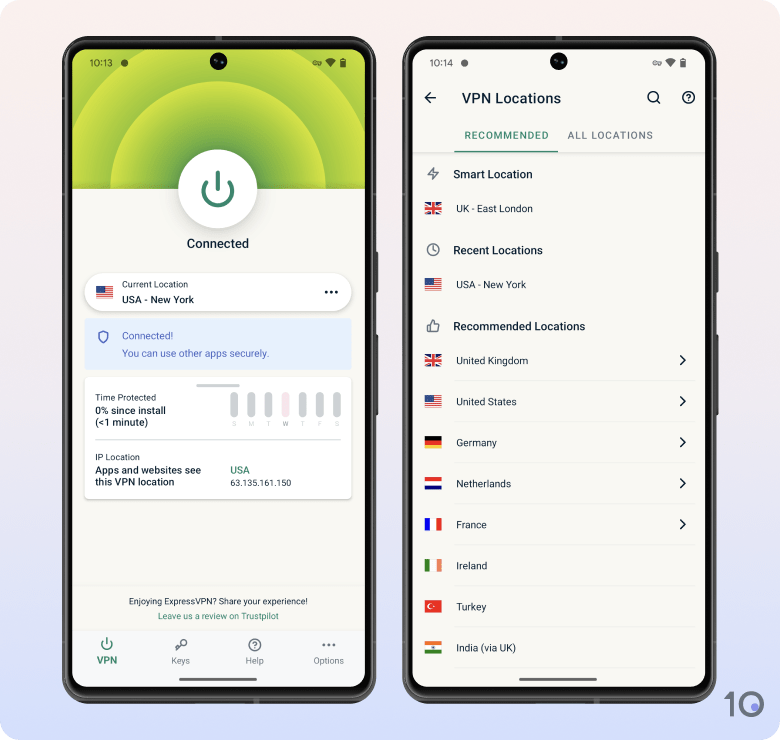
We’ve used ExpressVPN throughout this section, as it’s one of the best VPNs for Android, but the setup processes are similar for all Android VPNs.

Here’s how to install a VPN on Android:

  1. Check the VPN service has a native Android app.
  2. Subscribe to the VPN and create an account. You can do this on your VPN service’s website.
  3. Find your VPN’s app on the Google Play Store and install it. If you live in a country where you can’t access the Play Store, see how to install an .apk file below.
  4. Sign into the VPN. You’ll need to enter the account credentials you created in Step 2.
  5. Follow the prompts to complete installation. For example, ExpressVPN asks new users to share anonymous diagnostic information.
  6. Connect to the VPN. You can do this by tapping the central power button.

2. Use Third-Party Software (Manual Configuration)

If you don’t want to use the native app from your VPN service, or if it doesn’t have one, you can set up a VPN on Android using a third-party application.

This is more complicated than downloading a VPN app from the Google Play Store, but it doesn’t take longer than five minutes.

Third-party apps are usually more configurable than the VPN service’s own application and can even support multiple VPNs within a single app.

In the example below, we’ve manually set up ExpressVPN using the OpenVPN for Android app:

  1. Log into your account on your VPN service’s website. This method assumes you’ve already created a VPN account and purchased a subscription.
  2. Navigate to your VPN’s manual configuration setup. For ExpressVPN, this can be found under Set Up Devices > Manual Configuration.
  3. Make a note of your OpenVPN credentials. This should be a unique username and password. You will need these later.

    ExpressVPN manual configuration username and password

  4. Download a configuration file for your preferred server. Tap the server location you want to connect to and it will automatically download to your phone’s storage.
  5. Download OpenVPN for Android on the Google Play Store. Install it and open the app.
  6. Launch the app and select the folder download symbol. This is in the top-right corner of the app between the plus symbol and three vertical dots.

    OpenVPN for Android home screen

  7. Locate the VPN configuration file from Step 4. If you can’t find the configuration file in your Downloads folder, then you may need to select Internal storage first.
  8. Finish the download. You can do this by tapping the tick symbol to the right of the configuration file.
  9. Add your OpenVPN credentials. Under the Basic tab enter your username and password from Step 3, not your account credentials, and then press the back icon.

    OpenVPN for Android user credentials

  10. Connect to the VPN. Tap on the profile you’ve just created, it has the same name as the configuration file you used, and then accept the connection request.

Your VPN is now installed and active. If you want to disconnect, you’ll need to tap on its profile in the OpenVPN for Android app and select Disconnect.

3. Set Up a VPN Using an .apk File

If you can’t access the Google Play Store, you can install the VPN’s app onto your Android device as long as the service provides an apk file. It’s not as straightforward as using the Play Store, but it won’t take you long.

To avoid installing malware or tampered software, we recommend only installing .apk files from the VPN service’s official website.

Here’s how to install a ExpressVPN on Android using an .apk file:

  1. Adjust your Android’s permissions on downloading files. Go to Settings > Security > Install unknown apps and tap on the web browser you want to use for the download.

    Toggle on Allow from this source.

    Android settings for installing unknown apps

  2. Log into your account on your VPN service’s website. This method assumes you’ve already created a VPN account and purchased a subscription.
  3. Download your VPN’s .apk file. For ExpressVPN, this can be found under Set Up Devices > Android > Download APK.
  4. Select “Download anyway” when prompted. As long as you’re downloading from the official website of a VPN service you trust, you can ignore the warning message.

    A popup warning against downloading an APK file onto your Android

  5. Tap install.
  6. Launch the VPN and connect. The app will now function as a normal Android VPN app.

How to Set Up a VPN on Windows 10, 11, & Older

NordVPN's app for Windows

What You’ll Need to Set Up a VPN on Windows

  • A Windows laptop, desktop, or tablet
  • A VPN subscription

There are several ways to set up a VPN on your Windows device, but the easiest method is to install a native VPN application. If that doesn’t work for you, we’ll walk you through some alternative methods in this section.

1. Install a Native VPN Client for Windows (Easiest Method)

The easiest way to install a VPN on Windows is to download a dedicated app from your VPN service.

We’ve used ExpressVPN in the example below, as it’s currently the best VPN for Windows devices, but the process will be almost identical for most paid VPNs.

Here’s how to install a VPN on Windows:

  1. Go to the ExpressVPN website and download the app.
  2. Run the .exe file once it downloads. On Chrome, you can find the file next to your extensions on the toolbar.
  3. Allow ExpressVPN to make changes to your hard drive. This prompt should appear automatically.
  4. Click “Sign In with an Email link”. Other VPNs may require you to enter your account credentials at this stage instead.
  5. Enter your email address and select “Email Sign-In link”.
  6. Open the email and sign in.
  7. Follow the prompts to complete installation. For example, ExpressVPN asks new users to share anonymous diagnostic information.
  8. Connect to the VPN. You can do this by clicking the central power button.

2. Manual VPN Connection Setup (Without an App)

Windows 10 and 11 come with a built-in functionality for manually setting up a VPN connection. This method doesn’t require the installation of any software but you’ll still need a VPN subscription and account.

Before subscribing to a VPN, make sure you choose a service that supports the IKEv2 protocol as this is the only secure VPN protocol Windows supports.

This method isn’t the most straightforward and your VPN isn’t as flexible as a dedicated VPN app. For example, you can’t easily change your VPN server location.

Using Windscribe with the IKEv2 protocol, here’s how you set up a manual VPN connection in Windows:

  1. Log in to your Windscribe account. You’ll need a ‘Pro’ account to set up the VPN in this way.
  2. Go to Windscribe’s download page. You can do this by clicking the green download button on the top navigation bar.
  3. Navigate to IKEv2 manual setup. Scroll to the bottom of the page and select IKEv2, under Config Generators.
  4. Select your preferred server location from the dropdown menu.
  5. Click “Get Profile Details”. Make a note of your hostname and credentials.
  6. Access your VPN settings. Enter VPN Settings into the Windows search bar.
  7. Click “Add a VPN connection”.
  8. Enter in the following information:

    VPN Provider: Windows (built-in)

    Connection name: You can write anything here, but we suggest something memorable.

    Server name or address: Copy the hostname from Step 5.

    VPN type: IKEv2

    Type of sign-in info: Username and password

    User name: Copy the username from Step 5.

    Password: Copy the password from Step 5.

  9. Click Save, once you’re done.
  10. Connect to your VPN. Your VPN should have appeared back in VPN settings, click on it to connect.

3. Use An OpenVPN Config File (Hardest Method)

OpenVPN is an open-source VPN protocol that’s used by most VPN services. The OpenVPN Project, the developer of the protocol, also maintains open-source VPN clients for Windows operating systems newer than Windows 7.

These clients allow you to configure your own VPN connection using OpenVPN’s security credentials including its protocol, encryption, and authentication methods.

This setup method can be difficult, especially if you’re not tech savvy. Moreover, the VPN is quite limited once configured, and lacks the functionality of a native Windows VPN app.

Follow the steps below to set up a VPN on Windows with an OpenVPN configuration file. We’ve used IPVanish in this example:

  1. Go to OpenVPN’s download page.
  2. Select the correct installer for your version of Windows. It will most likely be “Windows 64-bit MSI installer”.
  3. Run the .exe file once it downloads.
  4. Customize your OpenVPN client. Select Customize and then click on any features you want to enable, we recommend OpenSSL utilities.
    OpenVPN custom installation on Windows
  5. Click Browse and choose a destination folder. The default is fine.
  6. Finish installation. Click Install Now > Close.
  7. Log into your IPVanish account.
  8. Navigate to the Server List.
    IPVanish server list config files on Windows
  9. Download OpenVPN configuration files. Under Configuration Files select OpenVPN and then click configs.zip. A ZIP file will begin to download.
  10. Move configuration files to OpenVPN directory. Open the ZIP file and extract the security certificate and OpenVN config files for your desired servers. Then, cut and paste them into whatever folder you saved the OpenVPN client in Step 5.
  11. From the start menu, run OpenVPN GUI.
  12. Open the system tray. In the bottom right corner of your desktop, click the arrow icon to bring up the system tray.
    Using OpenVPN Cofig Files on Windows
  13. Launch the VPN. Find an icon of a computer screen with a padlock and right-click it to reveal the servers you pasted in Step 10.
  14. Connect to the VPN. Click Connect and then enter your IPVanish Username and Password, then click OK.

    The computer screen and padlock icon should now turn green to indicate an active connection.

    OpenVPN icon on Windows

How to Set Up a VPN on iPhone & iPad

the Private Internet Access iOS app

In this section, we’ll walk you through three methods to install and use a VPN on your iPhone or iPad. The easiest way is to install a native iOS VPN application.

What You’ll Need to Set Up a VPN on Your iPhone or iPad:

  • An active VPN subscription with a trustworthy service provider.
  • An up-to-date device:
    • On iPhone, you need to be running iOS 10 or above.
    • On iPad, you need to be running iPadOS 13.1 or above.
    • To manually configure OpenVPN, you’ll need a desktop or laptop computer.

1. Install a Native VPN App for iOS (Easiest Method)

The simplest and safest way to install a VPN on your iPhone or iPad is to download a native VPN application from the Apple App Store.

We use Windscribe Free in the example below, as it’s one of our recommended VPNs for iPhone.

Here’s how to install a VPN on iPhone:

  1. Check the VPN service has a native iOS app.
  2. Create an account with the VPN. You can do this on your VPN service’s website.
  3. Find your VPN’s app on the Apple App Store and install it. If you can’t access the App Store, learn how to manually configure a VPN on iOS below.
  4. Sign into the VPN. You’ll need to enter the account credentials you created in Step 2.
  5. Allow the VPN to add a VPN Configuration. Your iPhone requires you to authorize all new VPN configurations.
  6. Enter your iPhone passcode to add the configuration.
  7. Connect to the VPN. You can do this by tapping the power button.

2. Add a VPN Configuration Using the Built-In VPN Client

If you’re unable to access the App Store, you can manually set up a VPN connection in your iPhone’s settings.

While this saves space on your device, the built-in VPN lacks essential features like a VPN kill switch or IP leak blocking. As such, it’s not as secure as the other setup methods we cover.

You will still need a VPN subscription to use this setup method.

WireGuard and OpenVPN aren’t available for this method, so we recommend IKEv2/IPSec. L2TP setup may require you to enter a ‘Secret’ in addition to a username and password. This ‘secret’ is a pre-shared key supplied by your VPN provider. However, pre-shared keys pose a security risk due to their vulnerability to brute force attacks.

Here’s how to do it:

  1. Navigate to your VPN settings. On your device go to Settings > General > VPN & Device Management > VPN
  2. Tap ‘Add VPN Configuration’.
  3. Fill in the fields for VPN configuration. You should be able to find this information from within your account or on the VPN server status page. Here’s an example using PrivateVPN:
    • Type: IKEv2
    • Description: Type in a name for the configuration, e.g., PrivateVPN – Sydney
    • Server: Type in the server address here
    • Remote ID: Type in the server address again
    • Local ID: Leave this field empty
    • User Authentication: Select Username
    • Username: Type in your VPN account username
    • Password: Type in your VPN account password
    • Proxy: Off
  4. Tap ‘Done’ in the top right.
  5. Use the Status slider to connect to the VPN. When connected you should see the word ‘VPN’ in your iPhone’s status bar.

How to Set Up a VPN on macOS

Surfshark's VPN app for macOS

What You’ll Need to Set Up a VPN on a Mac:

1. Install a Native VPN App for macOS (Easiest Method)

The simplest way to set up a VPN on an iMac or MacBook is to install a VPN’s macOS app. We’re using Surfshark below, but the setup process is similar for every Mac VPN.

Here’s how to do it:

  1. Subscribe to your chosen VPN service. We’ve used Surfshark in this example.
  2. Download the macOS app from the VPN service’s website.
  3. Run the downloaded .dmg file. The file will download into the Downloads folder. Click and run this file – it is the Surfshark Installer.
  4. Move the Surfshark application to your Applications folder. Open a new Finder window, navigate to the Applications folder on your Mac, and drag the Surfshark application icon there.
  5. Double-click the Surfshark app to run it. The service will open and ask for the necessary permissions. Note: some VPNs may require you to enter your Mac login details, or login details provided by the VPN service provider.
    Mac permission requests to use Surfshark
  6. Connect to a VPN server. Now Surfshark VPN is installed on your macOS device. You can find it in your Applications folder or via Launchpad. To use it, simply open the Surfshark application, choose a VPN server, and click ‘Connect’.
    Surfshark VPN home screen

2. Manually Configure a VPN (Without a VPN App)

Since the release of macOS El Capitan in 2015, all Macs include a feature that allows you to manually configure a VPN without the need for an app. This is useful if you’re on a device that prevents any app installations — like a work or school computer, for example.

This feature uses IKEv2 which is a flexible and relatively secure VPN protocol, with very fast speeds. However, IKEv2 is closed-source so there is no guarantee that it has not been compromised.

  1. Download an IKEv2 certificate from your VPN’s website. NordVPN and Surfshark are the only recommended Mac VPNs that allow manual IKEv2 configuration.
  2. Add the certificate to your login keychain. Open the certificate and select Add in Mac Keychain.
  3. Add a new network connection in your Mac settings. Open System Settings, click Network, then click the plus symbol.
  4. Configure your new network connection. Select VPN in the Interface dropdown menu and choose IKEv2 from the list of protocol options. After naming your connection, click create.
  5. Input server details. Locate your desired server ID from the VPN service and paste these ID addresses into the Server Address and Remote ID fields in System Settings.
  6. Enter authentication details. Click Authentication Details and input the username and password you used when signing up for the VPN service. Click Apply to save your changes.
  7. Connect to the VPN server. Click Connect and enable Show VPN status in menu bar. You are now connected to your chosen VPN server location and can connect and disconnect straight from the menu bar. The menu bar widget shows your connection status, along with your time connected to the server.

How to Set Up a VPN on a Smart TV, PlayStation, or Xbox

You can install a VPN on your smart TV or games console to unblock geo-restricted content and hide your IP address when gaming.

Aside from Amazon Fire TV Stick, however, most of these devices do not natively support VPN applications, which means you can’t install a VPN app directly.

You can find detailed VPN setup instructions for these devices in the articles below:

Otherwise, you’ll need to use the following workaround methods to safely use a VPN with these devices.

1. Use Smart DNS (Easiest Method)

Smart DNS isn’t the same as using a VPN. It’s a premium feature of some VPN services that spoofs your location via DNS, unblocking some streaming services in the process.

This makes it the best option for streaming restricted Netflix libraries on smart TVs or games consoles. However, it doesn’t encrypt your traffic or hide your IP address like a VPN does.

If that’s what you’re looking for, skip to our instructions on connecting your device to your computer.

Here’s how to set up Smart DNS on Smart TVs or games consoles:

  1. First, you’ll need a subscription to a trusted VPN provider that includes Smart DNS. We recommend ExpressVPN’s MediaStreamer.
  2. You need to give your VPN provider your IP address, so it knows to allow your traffic. If your IP address changes from time to time, you need to set up a static hostname. We recommend Dynu, which gives you a static hostname for free.
  3. Log in to your VPN account and give your VPN provider your hostname. In ExpressVPN, go to the settings for Dynamic DNS registration.
    ExpressVPN's dynamic DNS registration
  4. In your VPN account, find the Smart DNS server IP address. In ExpressVPN, it’s called the MediaStreamer server IP address.
  5. Go into your device’s Settings menu. Here, you need to configure the DNS with your Smart DNS server IP address.
    • On Apple TV, go to Settings > Network > WiFi > Configure DNS. Change from Automatic to Manual. Enter your Smart DNS IP address.
    • On PS4, go to Settings > Network > Set up internet connection > Custom. Enter these details for NordVPN:
      • Choose WiFi or LAN, depending on whether you have a wireless (WiFi) or wired (LAN) connection.
      • Choose ‘automatic’ for your IP address.
      • Choose ‘do not specify’ for the DHCP Host Name.
      • Choose ‘manual’ for the DNS settings.
      • Set the primary DNS to 103.86.96.103.
      • Set the secondary DNS to 103.86.99.103.
    • On PS5, go to Settings > Network > Set up internet connection. Click your existing connection. Choose Advanced Settings > DNS Settings > Manual. Set the primary DNS for NordVPN to 103.86.96.103. Set the secondary DNS to 103.86.99.103.
    • On Xbox, go to Settings > General > Network Settings > Advanced Settings > DNS Settings. Choose Manual for the IPv4 DNS settings. Add your DNS server in both the Primary IPv4 DNS and Secondary IPv4 DNS fields.
  6. Your device will now be configured to use your VPN provider’s DNS servers.

EXPERT TIP: Take note of your old DNS settings before you change them, in case you need to restore them later.

2. Connect Your Device to Your Computer

If you can’t install a VPN on your smart TV or games console, you can install it on your computer and then share your internet connection.

This gives you the benefit of a VPN connection without having to install a VPN directly onto your device.

Here’s how to do it:

  1. Install VPN client software on your computer using the instructions in this article.
  2. Share your internet connection from your computer, so it can be used with your smart TV or console.
  3. Update the network settings in your smart TV or console to connect to your computer, instead of connecting directly to your router.

See our detailed instructions for your device here:

  1. Connect your Xbox to the internet through your computer
  2. Connect your PlayStation to the internet through your computer
  3. Connect your Apple TV to the internet through your computer

3. Install a VPN on Your Router

If you install a VPN on your router, every device that connects through the router will be protected by the VPN. That includes smart TVs and games consoles that cannot run VPN software themselves.

Running a VPN on your router doesn’t have the flexibility of running a VPN on your computer, though. You can’t easily change server location or turn the VPN off.

Installing a VPN on a router is far from straightforward. There are three approaches you can take that we outline in the article below:

  1. Buy a router with the VPN software already on it. This is straightforward, but expensive. The router will be ready to use, you simply visit the router app and enter your VPN subscription details.
  2. Install a router app from your VPN service provider. ExpressVPN provides a VPN app you can install on your router, as long as it’s compatible. These apps help you to switch location and change the router settings.
  3. Manually install a VPN on your router. Some ASUS routers support the OpenVPN protocol, but other routers will need new firmware installed, which is a risky process.

How to Configure Your VPN Settings for Privacy & Security

Once you’ve installed a VPN on your device, it’s recommended to change the app’s settings for optimal privacy, security, and performance.

The best VPNs have these settings enabled by default, but it’s always worth checking them.

  1. Check your VPN is set to automatically start. If possible, it’s best to run your VPN when your device starts to ensure your web traffic is always protected.
  2. Check your kill switch is enabled. A VPN kill switch stops your real IP address leading if the VPN connection unexpectedly drops. You can use our VPN Kill switch test to check if yours is working properly.
  3. Check you’re using OpenVPN or WireGuard. OpenVPN and WireGuard are the two fastest and most secure connection protocols available. If your VPN uses PPTP, L2TP/IPSec, SSTP, or IKEv2/IPSec by default, we recommend switching protocols.
  4. Check your encryption. If your VPN allows you to customize your encryption cipher, select AES-256-GCM for optimal security.
  5. Check leak protection is enabled. Once you’ve enabled any leak protection settings, try our VPN leak test to verify that your real IP address and other identifying information is not leaking through the VPN.

How to Choose the Right VPN Server

It’s essential you choose the correct VPN server for your needs. The server location you connect to determines your virtual IP address and geo-location as well as affecting your connection speeds, file-sharing bitrate, streaming quality, and ping.

To simplify this for you, we’ve created a flowchart breaking down which VPN server you should choose depending on your requirements:

Flowchart outlining the optimal VPN servers for common VPN use cases

View an enlarged image of our flowchart.

FAQs

Can you set up a VPN for free?

You can set up a VPN for free, and the setup process is almost identical to setting up a paid VPN service. However, most free VPNs are slow, insecure, and don’t unblock streaming services like Netflix.

It’s worth paying for a good VPN, but if you’re on a tight budget, we’ve reviewed the best free VPNs here.

Do I need to install a VPN on all my devices?

If you’re using a VPN to protect your online privacy and security, it makes sense to install it on all of the devices you use to browse the internet. This might typically include your laptop, smartphone, or tablet.

However, if you’re using a VPN to unblock geo-restricted streaming content or other services that aren’t available in your region, it may only be worth installing a VPN on the device you use to access that content or service.

It’s worth keeping in mind that most VPN services have simultaneous connection restrictions, which can limit the number of devices you can use the VPN with at one time.

You can install a VPN on your router to protect all of your connected devices without surpassing this limit, but it’s harder to install and manage a VPN on your router.

Do I have to set up my VPN manually?

Most of the time, the easiest way to set up a VPN is to install a dedicated VPN app, which doesn’t require any manual configuration.

However, devices that can’t run VPN apps directly – like games consoles and smart TVs – are a bit trickier. In this case, Smart DNS provides an easy way to unblock streaming services on those platforms.

You will need to set up your VPN manually if you don’t have permission to install software on your device, or if you don’t want to install a VPN application using the traditional method.